Sunking Innovatively Wraps Up the HP Chip Problem
Sunking Innovatively Wraps Up the HP Chip Problem

(Note: the size of the chip has been enlarged in this image)
A more cost-effective method of dealing with annoying firmware updates on chips in HP printer cartridges has been solved without the need to replace the original OEM chip with an expensive compatible one.
China-based Sunking claims its “chip-patching” remanufacturing solution cannot infringe the patents of the OEMs because it uses the original OEM chip.
The permissible repair of any worn out or damaged product can be conducted on components such as chips, as part of the remanufacturing process.
Sunking also claims its “chip-patching” solution works on compatible chips currently available in the market.
 “The HP 110A, 105A and 106A series and the color series of chips are deemed to be the most difficult to remanufacture,” says Lincoln Lin (pictured), General Manager of Sunking. “It may be the only monopoly OEM chip in the world.”
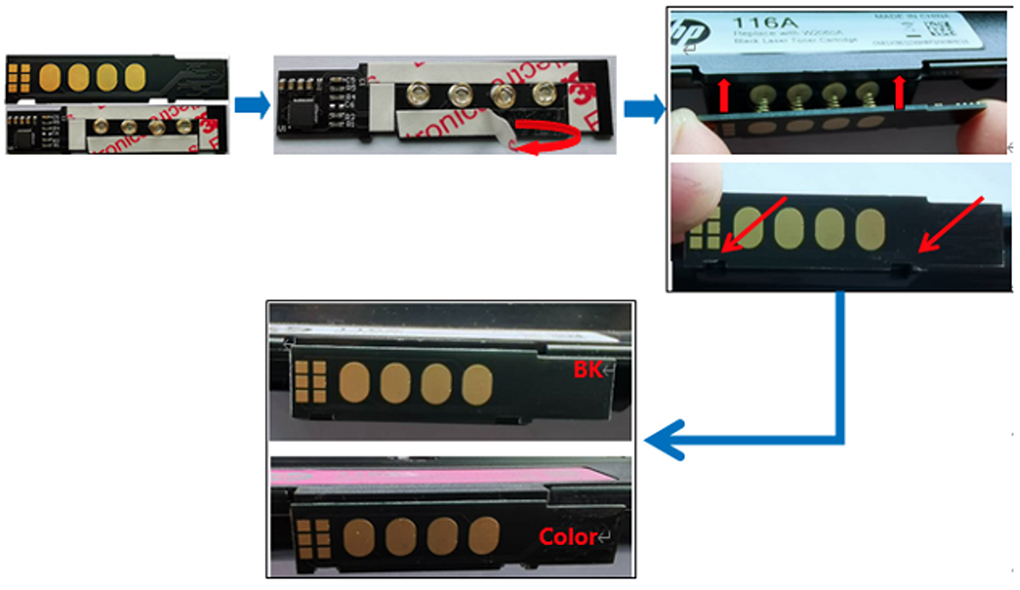
Lin adds Sunking is thrilled to make a breakthrough with this series of chips by simply adding a patch to the existing OEM chip (see the images and methodology below).
The chip-patching solution is not only IP friendly, it is a significantly cheaper alternative to using compatible chips. “Take the HP 118A color chips, for example, our solution can save between 40% and 60% per cartridge for manufacturers and remanufacturers who have had to rely on compatible chips,” says Lin.
The solution has already drawn the attention of HP, according to Lin. “We have been told our Sunking patch solution could greatly boost the sales of HP devices.”
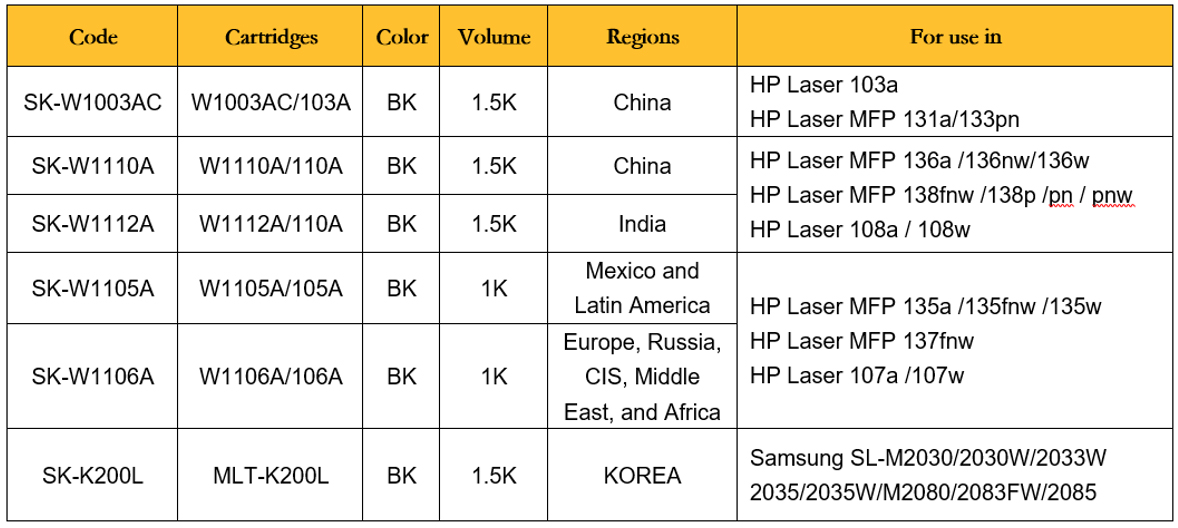
According to the company, the patched chips can be used with existing used OEM HP chips and compatible chips, including W1110A, W1003AC, W1107A, W1106A, W1105A, W1112A, MLT-K200L, 116A,117A, 118A, 119A and CLT-510/CLT-515.
For monochrome cartridges:
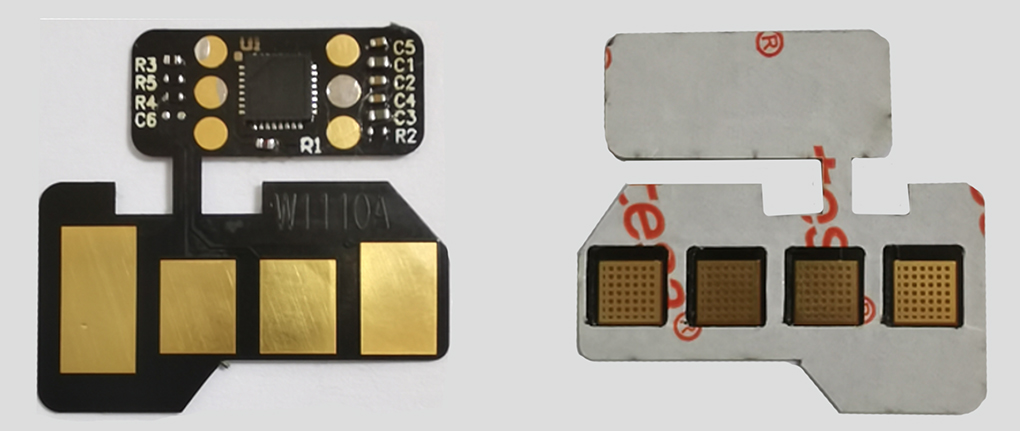
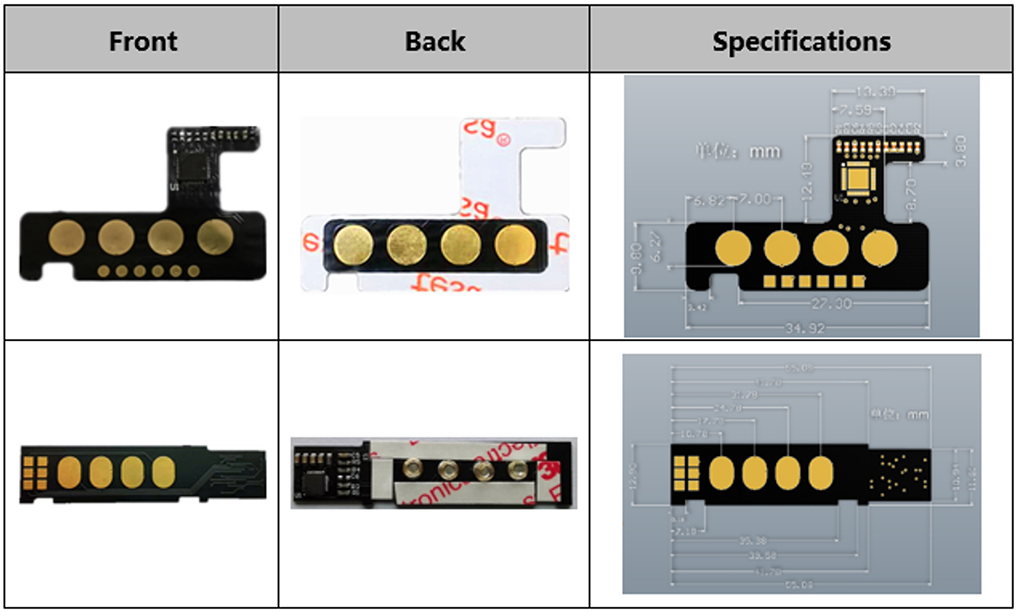
- Workaround Solution Appearance
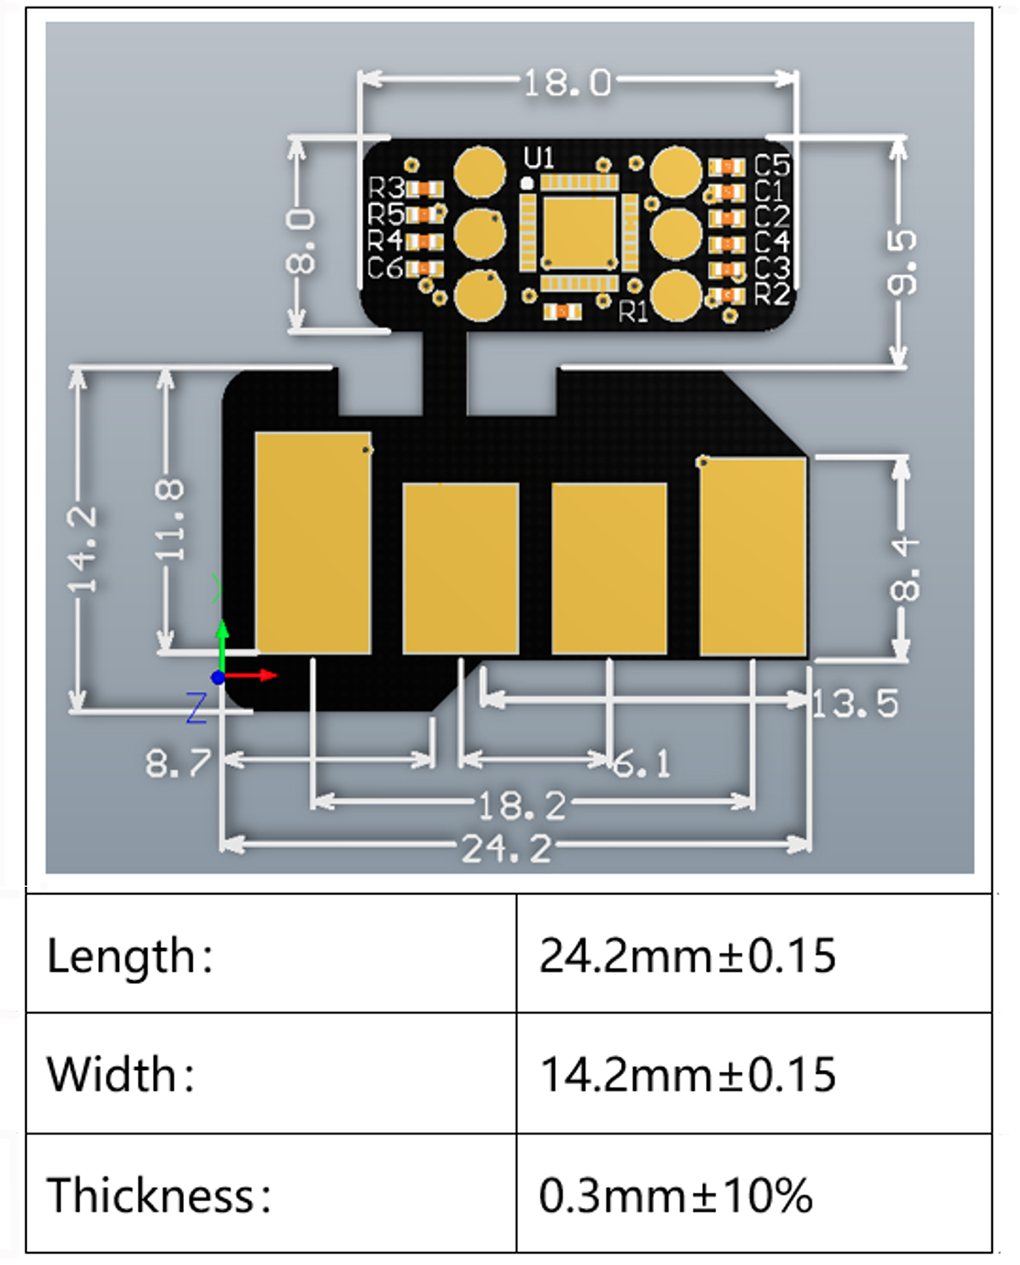
- Workaround Solution Specifications:
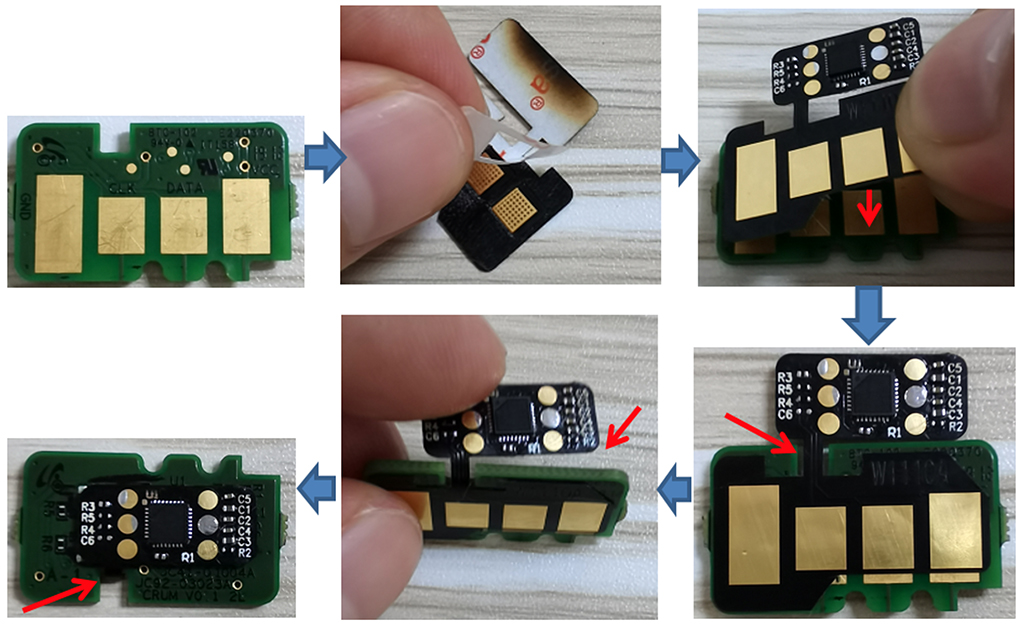
- Installation
- Prepare an OEM chip that has been used to the end of its life;
- Remove the double-sided adhesive sticker on the back of the workaround chip;
- Place the gold finger face up and the adhesive face down, extend the edge of the gold finger face of the OEM chip, and attach it to the gold finger face of the OEM chip;
Note: the workaround chip gold finger shape one-to-one correspondence with the OEM chip gold finger shape and pay attention to whether the gold finger position is correctly aligned.
- After attaching the gold finger position, avoid the middle wire position on the workaround chip, extend the gap above the OEM chip to flip, and attach the small plate with electronic components to the 8-pin IC on the back of the OEM chip;
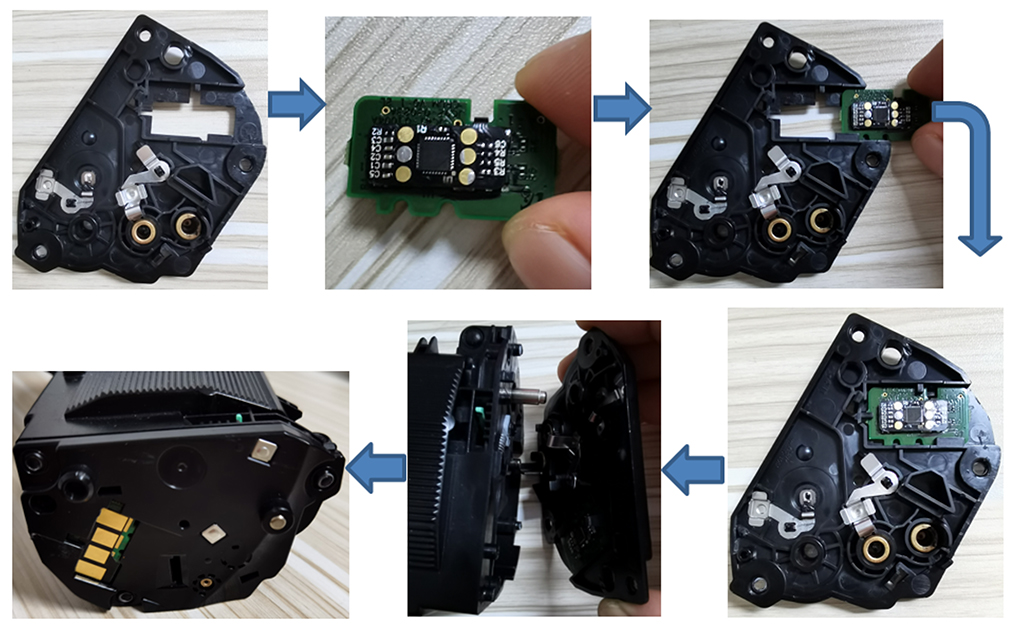
5. Install the workaround chips to cartridges:
-
- Remove the right-side cover of the original remanufactured toner cartridge, turn the side cover over and place it flat on the desktop;
- Place the chip’s golden finger down and the longest golden finger to the right, and hold it with your hand;
- Insert the chip into the guide slot according to the direction, and insert it to the bottom;
- Put the side cover back on the toner cartridge and weld the solder joints tightly;
For Color Cartridges:
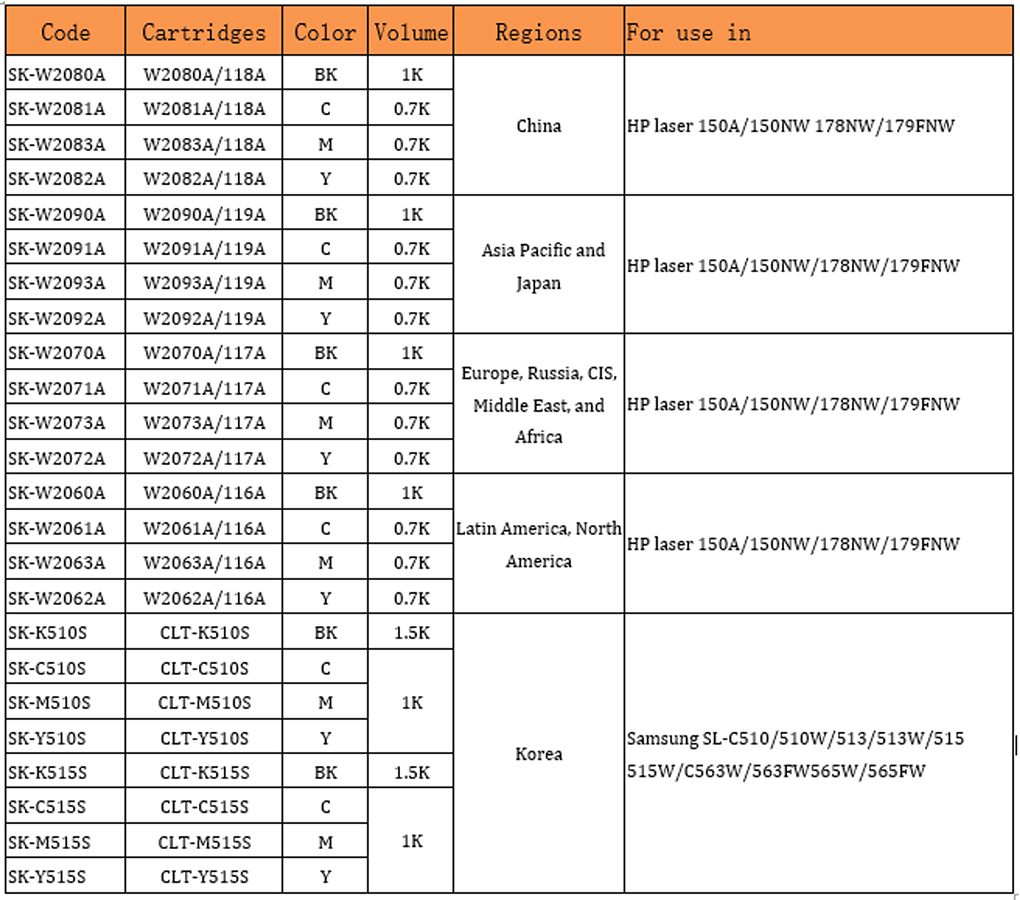
There are two types of workaround solutions for the color series.
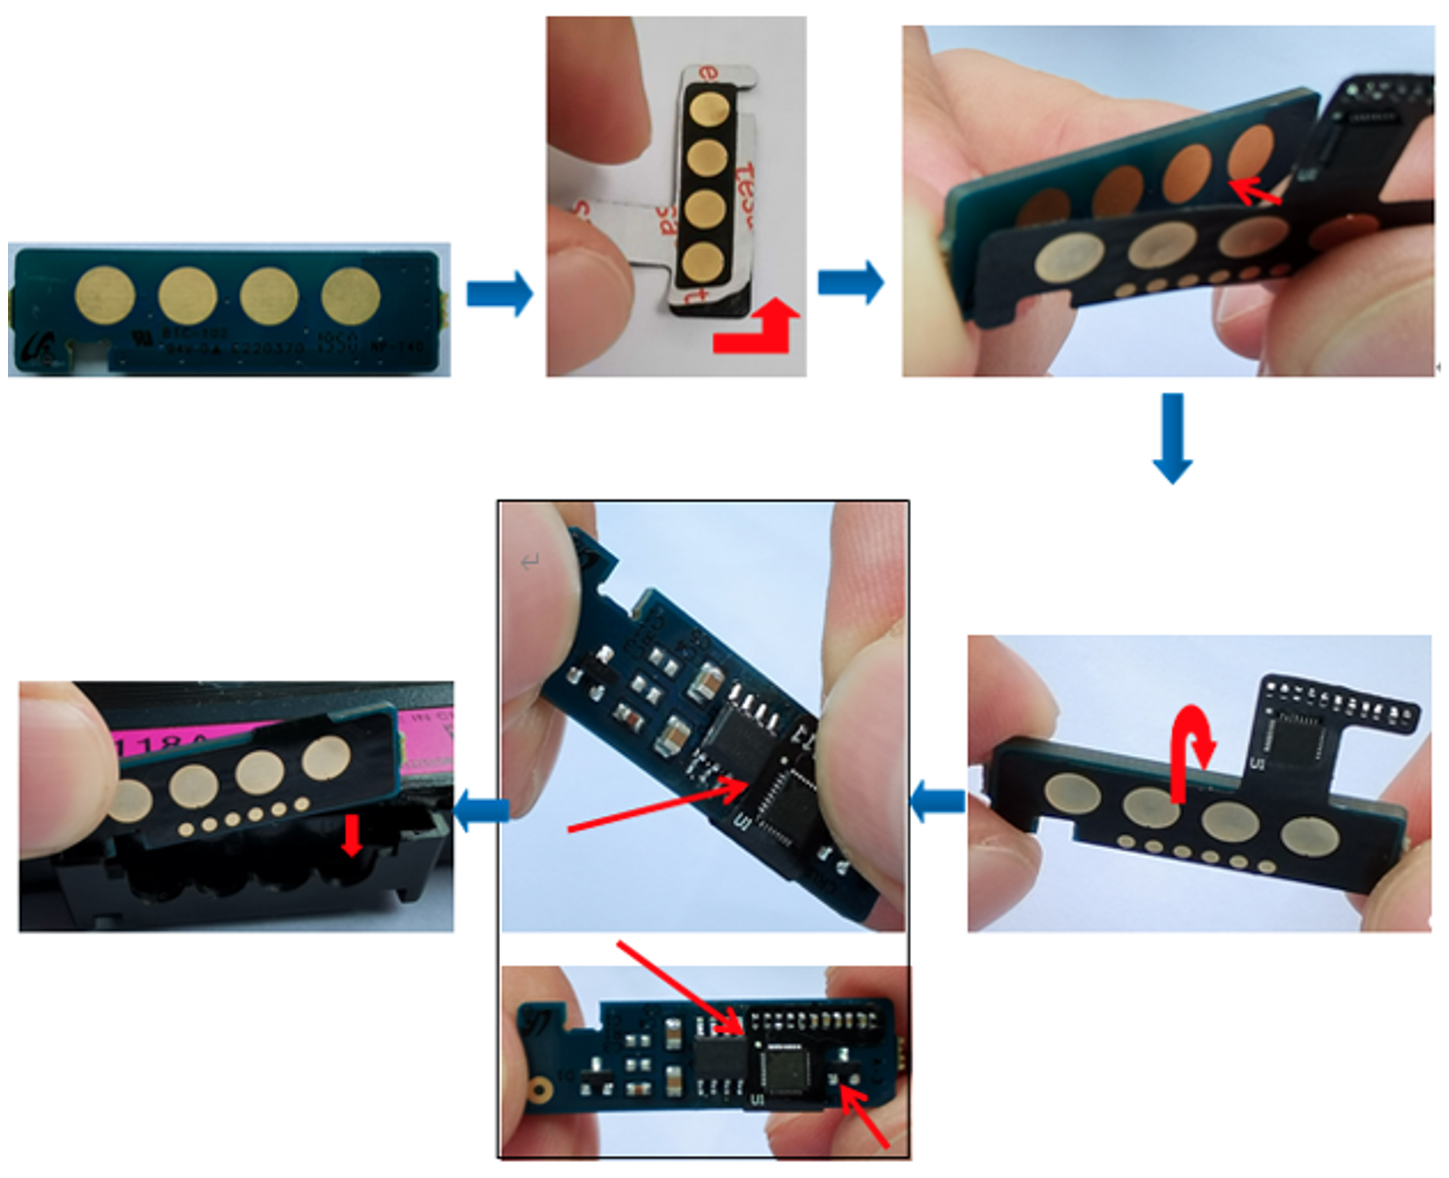
- Installation
- For OEM cartridges
- Prepare an OEM chip that has expired, and wipe away the dirt from the chip’s golden finger with alcohol or an eraser;
- Remove the double-sided adhesive sticker on the back of the patent chip;
- Place the gold finger face up and the adhesive face down, align the edge of the gold finger face of the original chip and the notch at the bottom of the chip and attach it to the gold finger face of the original chip;
Note: Avoid the one-to-one correspondence between the gold finger position of the workaround chip and the OEM chip gold finger, and pay attention to whether the gold finger position is aligned;
-
- After sticking the golden finger position of the chip, avoid the middle wire position on the workaround chip, extend the top of the OEM chip to flip, and attach the small board with electronic components to the middle of the 8-pin IC and the transistor on the back of the original chip;
- After attaching the chip, it can be installed to the OEM toner cartridge chip card slot normally;
- For Remanufactured Cartridges
- Use a cotton swab and alcohol to wipe the dirt on the golden finger of the old OEM chip in the toner cartridge that has been tested (image quality);
- Tear off the double-sided adhesive sticker on the back of the workaround chip;
- Align the outer edge of the workaround chip with the peripheral frame of the chip card slot on the black toner cartridge, the color chip with the notch position on the cartridge and the outer frame, and the spring on the back of the chip with the OEM chip contacts;
Note: Avoid workaround chip springs that correspond to the gold fingers of the OEM chip one by one, and pay attention to whether the protruding spring passes through the gold finger position of the toner cartridge chip and whether the gold finger of the old original chip is aligned;
-
- Press and attach the chip to the outer plastic part of the chip card slot of the remanufactured toner cartridge, and then it can be printed normally.
For more details, contact Sunking:
- Online at Find-a-Supplier
- Telephone: +86 (0)755-2784-0619
- Email:sales@sunkingtech.com
Related:
- Sunking Discloses “Secrets” of Samsung CLT-D404 Chips
- Sunking Intros New Chip Reset Program for Lexmark Models
Comment:
Please add your comments below about this story “Sunking Innovatively Wraps Up the HP Chip Problem” or join the conversation on LinkedIn.





Leave a Comment
Want to join the discussion?Feel free to contribute!